
Develop and Test a REST API with Postman

Kevin McDonald
Application Development Consultant
“In the modern age of software development, tools for consolidating and simplifying workflows development work streams have become essential for developers building all kinds of applications. For developers building APIs, Postman has become well-known for the way it empowers developers to not only test their applications, but also for the way it aids them in following SDLC best practices. In this tutorial, we will take advantage of these features and use Postman to develop and test a REST API.”
What is Postman?
According to their website, “Postman is an API platform for building and using APIs. [It] simplifies each step of the API lifecycle and streamlines collaboration so you can create better APIs—faster.” In broader terms, Postman is a tool for API developers to use to collaborate on and test their work. Many developers are aware of Postman’s role as an API client, but it has many more great features that can be explored. Among its laundry list of features are:
Workspaces creates shared workspaces for teams to help organize work and collaborate across your organization
Easy-to-use web and Windows desktop client app
An API client for designing and testing all types of HTTP requests
Easy-to-use documentation creator
Governance: Postman's full-lifecycle approach to governance lets adopters shift their development process, resulting in better-quality APIs, and fostering collaboration between developer teams and API design teams
Postman integrates with tools in your software development pipeline to enable API-first practices
During this blog, we will explore each of these features while designing the REST API demo.
We will be designing and developing a REST API for an online pet store using Postman. Since the purpose of this tutorial is to demonstrate the features of Postman, and not to demonstrate how to code a REST API, we will not focus on the source code of the application. If you’d like to see the source code for the Node.js/Express application however, it is available on GitHub.
API Design

The first step when developing a REST API is to establish the overall design by assessing the business and computing requirements of the application. Understanding what the application needs and doesn’t need is a vital first step, and will help you avoid common pitfalls of API development.
Postman provides you with a suite of tools to help you design your API called Postman APIs. Postman APIs allow you to not only document your API (using things like OpenAPI or WSDL), but also manage test suites and deployments.
To create a new API in Postman, we must first create a new Workspace to use. Workspaces are where teams can collaborate and share APIs and other work in order to develop together. Let’s create a Workspace called “Pet Store Demo” to hold all of our work.

Note the “Visibility” options when creating a new Workspace. This allows you to decide how you would like to share the work you are doing and sets up the Workspace accordingly. You can see the details of each option below, along with some common use cases and security remarks
In our case, we will use the “Team” option in order to demonstrate what a typical shared Workspace environment would look like. For more details on all the security features of Postman Workspaces, see the documentation here.
Now that we have created our Workspace, we need to create a new API inside it to work with. Navigate to the APIs tab on the left and then click on the button to create a new API.
For our demo API, we will be using OpenAPI 3.0 in YAML format for our schema, however, Postman gives you the ability to choose from many other options including WSDL, GraphQL, and RAML.

Now that we’ve created our API in Postman, we can start to write our schema using the Definition tab of the API page

Endpoints
Our application functions as a simple API for an online pet store. There are two main components to this store: a way for customers to browse pets and place orders, and an admin interface for managing users and pet information. Using this information, we can start designing the API by listing out the endpoints we need:
GET /api/admin/users/{id} - Gets the user with the given ID
PUT /api/admin/pets/{id} - Updates the pet with the given ID’s details
GET /api/pets - Gets a list of all the pets from the store
POST /api/orders - Submits a new order to the store

We can create these endpoints using the paths field on our OpenAPI spec
For now, we will ignore the parameters, requestBody, and responses fields on each path, but we will revisit them later. For more details on the paths field, see the OpenAPI 3.0 documentation.
Request/Response Models
Since our application is meant to communicate with other applications, we need to define the structure of the data that it sends and receives i.e., the data models. Our application will be using JSON models for all its payloads, and we can define those models in the components section of our API spec:
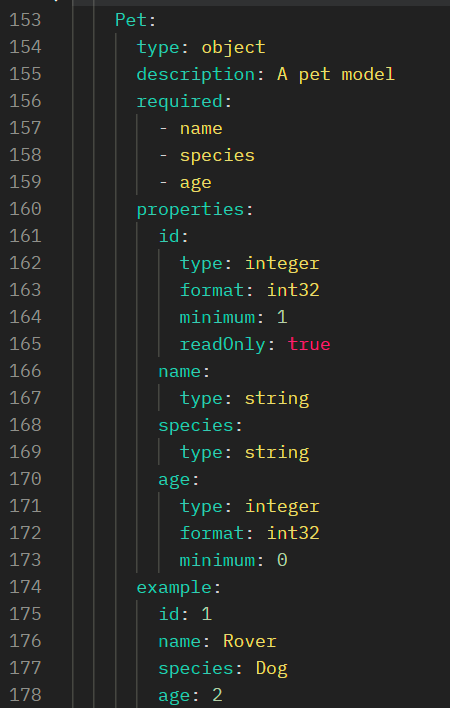
Important fields to note here are the description, properties, and example fields:
description - Provides API consumers with a plain text description of what this object models
properties - Provides API consumers with a list of the properties that belong to this model, and any constraints or details for each
example - Provides API consumers with an example of what this model looks like in requests or responses
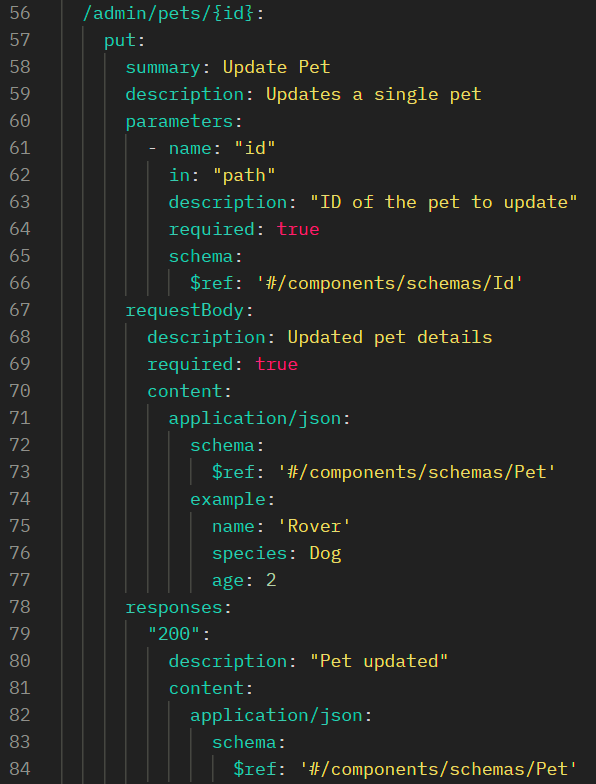
Once the models are defined, we can configure them in the path entry associated with each model as requests or responses:
For more information about the schema, requestBody, and responses objects, refer to the OpenAPI 3 documentation.
Security
All modern APIs need some type of security scheme in order to protect against unauthorized usage. For this demo, we will use the most basic form of authentication over HTTP—HTTP Basic Authentication—since it is the easiest to set up and test; however, for enterprise-level applications or any internet-facing application, a more secure authentication method should be used such as OAuth or HTTP Digest.

We can define the type of security used for the API in the security and securitySchemes objects in the API spec:
Here, we have specified that our API uses HTTP Basic authentication for all its endpoints. You can also define security at the path level, or even method level if you need to. For more information about the security and securitySchemes objects, refer to the OpenAPI 3 documentation.
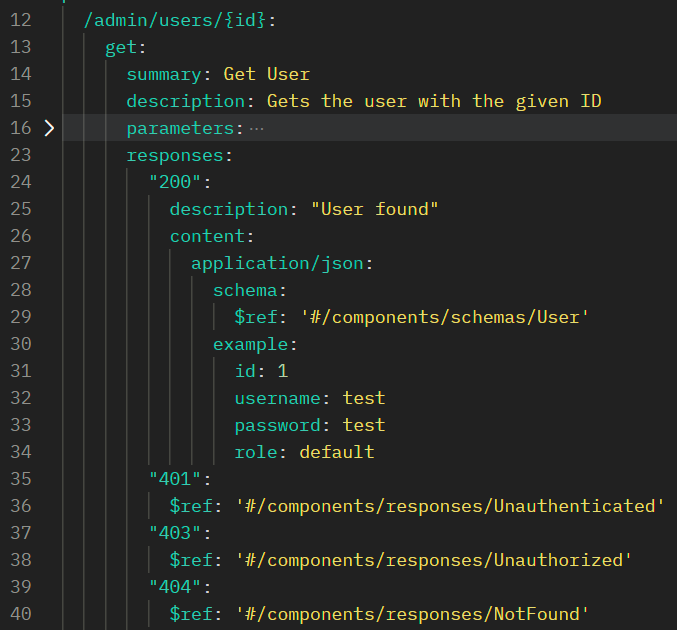
We should also define the authentication-related responses on each path so that API consumers know what to expect when something goes wrong

Now that we have finished designing the API, we can move on to creating the tests we will be running to aid us during development. To see the full OpenAPI spec that was created for this demo, check it out on GitHub.
Test Driven Development (TDD)
Test Driven Development, or TDD, is a style of programming that revolves around writing use cases first, and then writing the code to fulfill those use cases later. Its practice can lead to fewer defects and higher design quality in the code, which directly translates to better applications.

Postman enables TDD by giving developers the option to generate Collections based on API specifications, essentially writing test cases automatically! Collections in Postman act as a way to organize requests to an API and can be used to generate documentation and test cases. We can generate a Collection from our API spec by selecting the Generate Collection button on the Definition tab of our API:
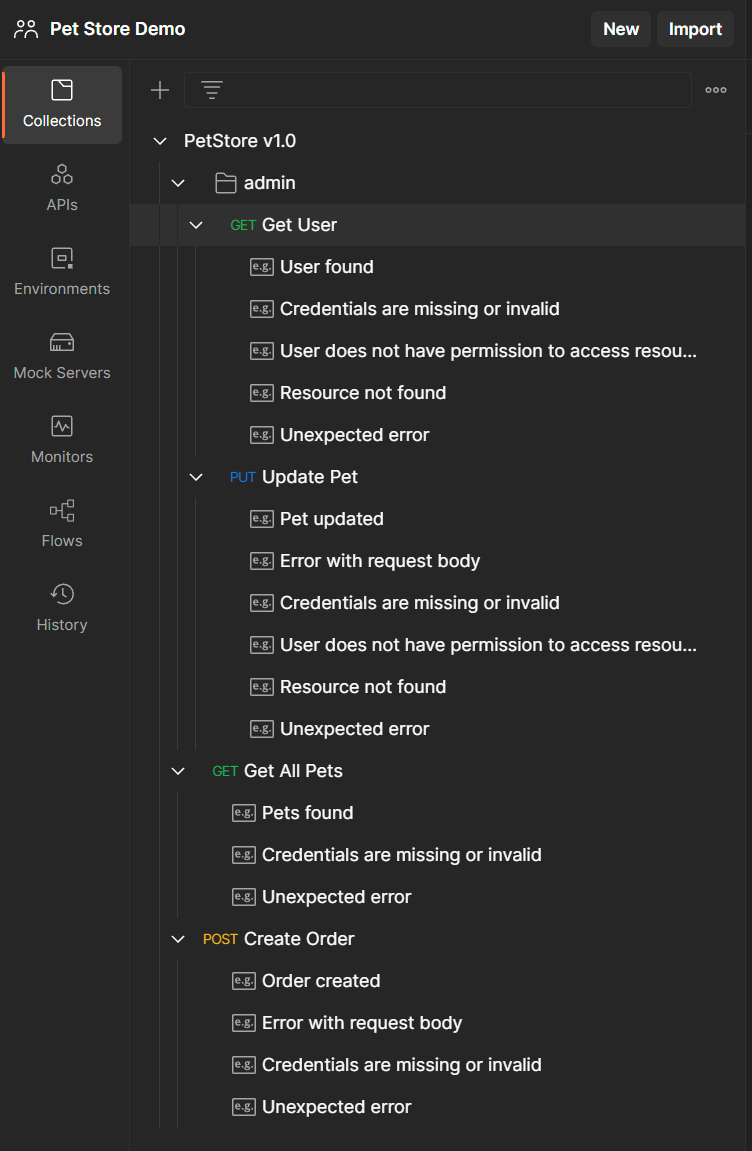
Once we click Generate Collection, Postman will analyze our API schema and automatically create a Collection for us to use in our tests!

As you can see, Postman has created Requests for each of our endpoints and added examples of our API responses.
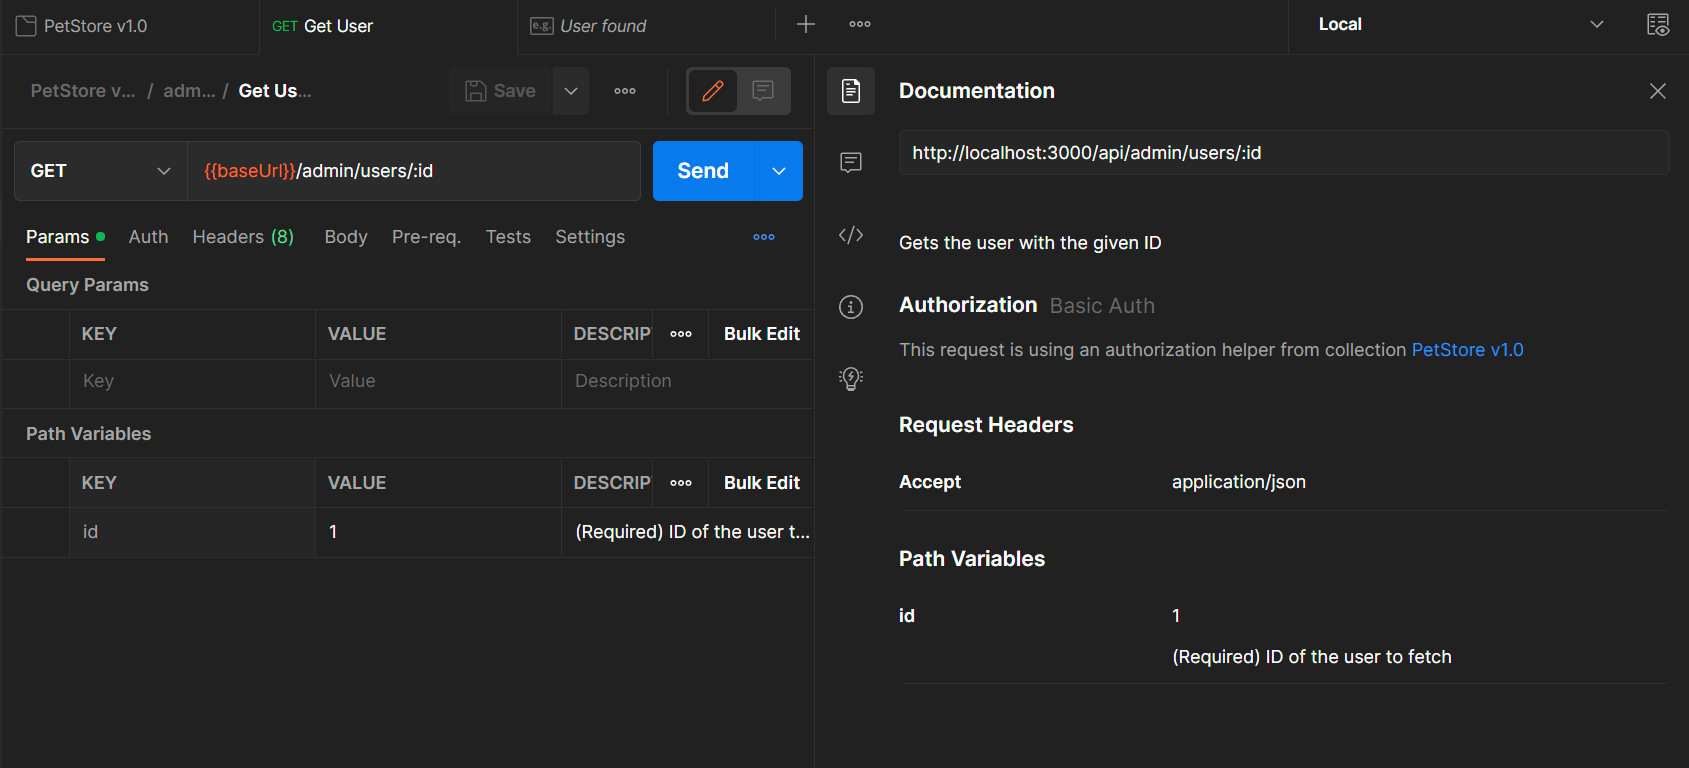
It also generated documentation for each Request, which can be found by selecting the Request and clicking the Documentation tab on the right
The only remaining work to do is to update the Collection’s Authorization configuration and write our unit tests.
Configuring Postman Collections

For the purposes of this demo, two users have been created in the application’s database: one with an admin role, and one with a default user role. Security has also been added to each of the API endpoints which checks the credentials of the user invoking the API and makes sure that the user’s role allows them to access the requested endpoint.
To see the code that does this, refer to the source on GitHub. We can set up the Collection to use the configured credentials in order to test the security of our API. In our case, Postman has organized our admin requests into a folder called “admin” in our Collection. We can configure the Authorization at the Collection and folder levels so that all requests use the proper credentials.

At the Collection level, we will configure Postman to use the default user’s credentials. At the “admin” folder level, we will configure Postman to override the Collection’s default Authorization to use the admin credentials
Writing Postman Test Scripts
Postman allows us to write scripts using JavaScript to run before and after our requests. These scripts can perform tasks such as setup and testing and can use the custom Postman SDK to interact with the Postman environment. More information on how to use the Postman SDK and write Postman scripts can be found here.

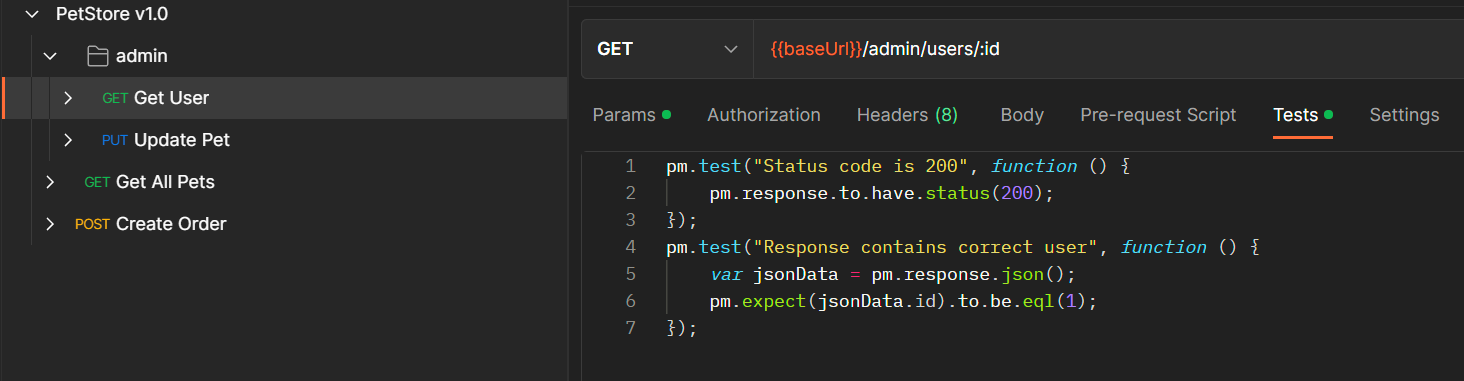
For our API, we want to write tests on each request that can verify the functionality of our application. We can start writing tests by navigating to the Tests tab on any Request in our Collection
In this test, we are testing to make sure that the API responded with a successful response code (200) and that the body of the API response contained what we expect: a user with the ID that we requested.

When we send the request, assuming that the Node.js application is running locally, we can see the response and the results of the tests that we wrote in the Postman window:
Testing a REST API
Testing an API is just as important as writing the code, because, without tests, you’ll never know if the code you wrote is working properly. Postman makes it very easy to write and run tests against an API using its JavaScript SDK, as we saw in the previous section. Now, we will expand a bit on how you can write and manage suites of tests, and run them in a CI/CD environment.
Postman Collection Runner
When testing any new changes or features on an API, it is crucial to make sure that any changes made do not end up breaking other parts of the application. Typically, to ensure that you have not broken other parts of the application, you should run a suite of test cases, that are written to establish a baseline for functionality, against the application. Postman helps us achieve this by providing a feature, the Collection Runner, which runs all the requests in a Collection and reports the results.

To use the Collection Runner, navigate to the API definition page and select the “Test” tab
Here, we have several options for running tests against our API. We can:
Add test suites (Collections) to run
Validate our Collections against our API schema (currently only supports OpenAPI 3)
Run our Collections as a test suite
Check the results of each run
Let’s run our Collection now to see the results! First, make sure your API is running and your Collection is configured to send requests to it. Then, select the “Run Test” button in the last column of the Tests table.
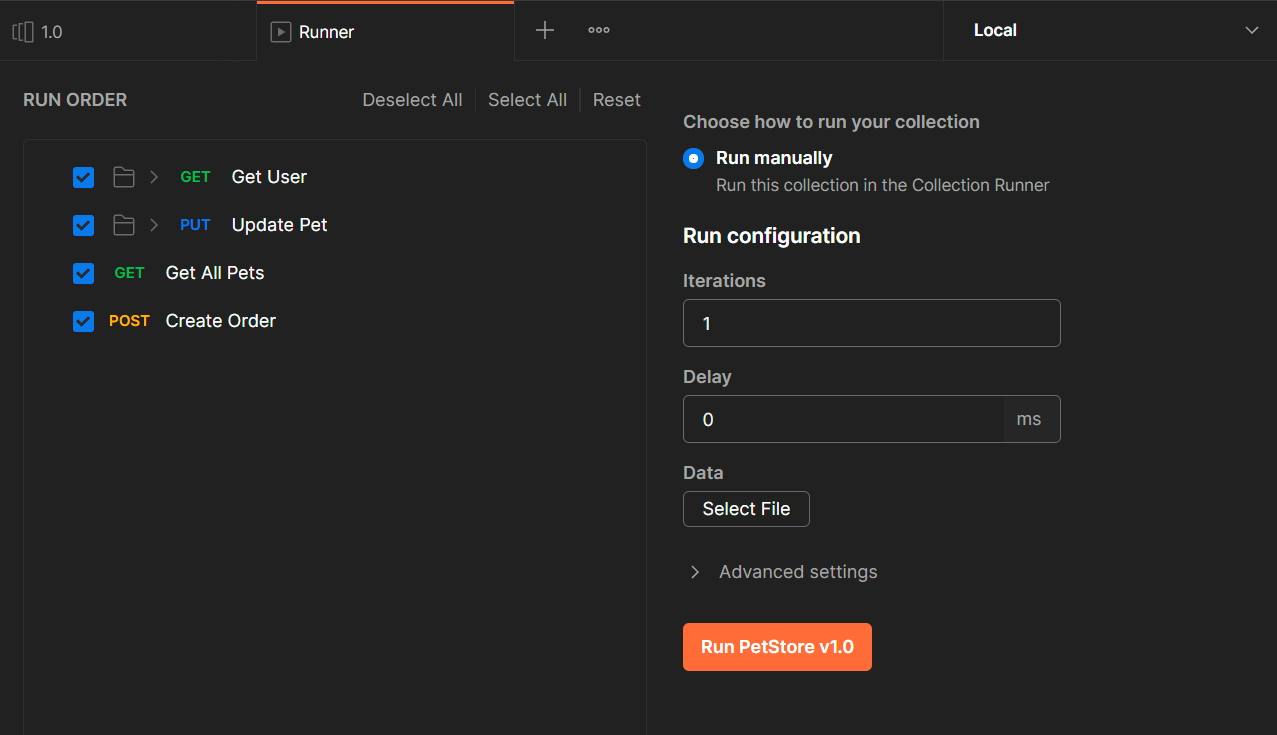
Now you can configure the Collection Runner to run your Collection using a few different options:
Run Order - You can decide the order to run the Requests in, as well as select which Requests you would like to run
Iterations - You can choose the number of times you want to run this Collection
Delay - You can set up a delay (in ms) between each Request
Data - You can choose to provide the Collection Runner with a Data File to use as part of its Requests. Data Files can be used for configuration or for setting variable values on a Request. For more info on Postman Data Files, see the Postman documentation

Configure the Collection Runner to use the default values. Now, select “Run PetStore v1.0” to run the Collection:
We can now review all the test results, and fix any issues that are found. We can also export the test results in JSON format using the “Export Results” button. This is especially useful when integrating Postman tests into CI/CD pipelines.
Integrating Tests into CI/CD Pipelines with Newman
Continuous Integration and Continuous Deployment (CI/CD) are a cornerstone of Agile software development. It allows teams to build, test, and deploy code using automated services, which allows developers to focus more of their time on writing code than on creating and supporting infrastructure. Examples of popular CI/CD tools are Azure DevOps Pipelines, Jenkins Pipelines, AWS CodeBuild, GitHub Actions, and many more.
Using Newman CLI
Postman makes it easy to integrate test suites into CI/CD pipelines by providing a command-line interface (CLI) tool called Newman. Let’s run our Collection using Newman to demonstrate how easy it is to use. First, you must install the Newman CLI using npm, the Node package manager (steps to install can be found here). Once Newman is installed, we need to prepare the necessary files to use as input for Newman.

Newman consumes JSON files to run Collections, so we must first export our Collection as a JSON file. Select the Collection from the Collections tab and click on the Export button:
When the Export popup appears, you can select the default options and click Export:

Save the JSON file to an appropriate location on your machine and note the path; it is important for Newman to be able to find your Collection.
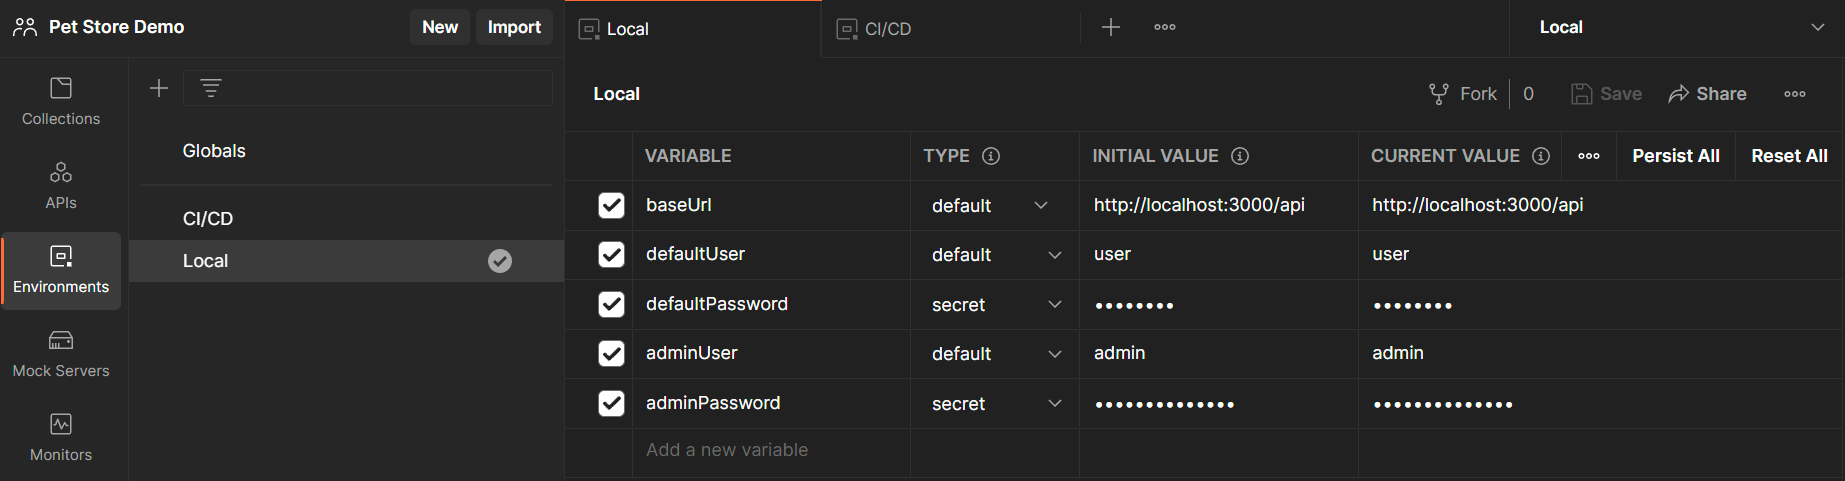
Since we intend to use this Collection as part of CI/CD, we should create Postman Environments that will allow us to configure our Collections to switch contexts easily. We will create two Environments, “Local,” and “CI/CD,” which correspond to running the application locally vs running the application in CI/CD:

Each Environment contains variables that Postman will substitute into our Collection depending on which Environment it is configured to run in. In the “CI/CD” Environment, we can placeholder values that can be replaced either manually or programmatically when running the Collection during CI/CD builds.

After we create these Environments, we need to also export them as JSON files, similarly to how we exported our Collection.

Once our Environments have been exported, we can finally use the Newman CLI to run our Collection from the command line
Here is a quick description of the options provided to the newman run command:
‘.\collections\Petstore v1.0.postman_collection.json` - This is the path to the exported Collection
-e .\environments\Local.postman_environment.json - This uses the -e command option to tell Newman which Environment file to use with the Collection
CI/CD Integrations for Newman
Many CI/CD tools come with integrations specifically for Newman, and others can take advantage of running Newman using command-line scripts and Node.js. Here are a few of the most popular integrations:
Azure DevOps Pipeline: Newman the cli Companion for Postman
Jenkins: Shell script with NodeJS extension
GitHub Actions: Newman Action
AWS CodeBuild: Example YAML configuration
For more information about the Newman CLI and CI/CD integrations, refer to the Postman documentation.
Final Remarks
In this article, we have demonstrated how to develop and test a REST API using Postman’s API tool suite. We’ve seen how we can design and document our API using Postman APIs, how we can generate tests using Postman Collections, and how we can run our tests and integrate them with CI/CD tools using Newman. Using these tools, developing a production-ready web application should be fast and easy, thanks to Postman.
I hope this guide has been helpful and I wish you the best of luck in your development career! Happy coding!